Curled Rings . 3 Options
 |
| Bird's eye view of 3 Options - front & back |
(Please note : the terms below are for reference & not necessarily part of the tatting lexicon unless it catches on.)
- Curl Up / Curl Down : Is the tip of the ring (picot) brought up to lie over the base when curling ; or is the tip folded in downward direction so that the base lies on top of the picot when joining ?
- Curl Over / Curl Around : Does the ring curl over itself or does it curl around a chain or ring, thus encapsulating that element?
- Curl In / Curl Out : Does the curl face inwards or outwards ? Usually, a Curl In encapsulates an element.
- Join : Curl can be anchored using a Normal Picot Join, Slope & Roll Join, or a Lock Join.
- Curl can be Single or Multiple – in the sense that the curl/join is made through a single picot (normal ring, onion ring, split ring) or the join is made through several rings simultaneously.
♤ The initial options have more detailed steps, which will peter out going forward to avoid repetition.
♤ There is no particular sequence that is being followed. Just trying to cover as many bases as possible in some cogent fashion.
♤ 2 colours have been used for clear distinction & demarcation of elements, joins, etc.
♤ Stitch counts are indicated for each element/round, for practice purposes.
♤ 2 colours have been used for clear distinction & demarcation of elements, joins, etc.
♤ Stitch counts are indicated for each element/round, for practice purposes.
OPTION 1
Curl Features : Down , Over , Out , Lock Join , Multiple

 |
| Curl Down (folding ring downwards), Curl Over (folding on itself) |
 |
| Curl Multiple (3 rings being curled & joined together) |


 |
| Lock Join (through 3 rings simultaneously) |
TIP : A Lock Join is preferable in this case, as it will secure the multiple rings firmly in place.
Image 7 shows the curled rings from front.
Image 7 shows the curled rings from front.
 |
| Curl Out (rings curling/facing outwards) |
I used Option 1 for the brown center of the Pendant here, except that the 3 rings were not joined to each other.
OPTION 2
Curl Features : Up, Over, Out, Picot Join , Single


TIP : A Slope & Roll Join could also work in 2 coloured tatting, to avoid colour blips !
OPTION 3
Curl Features : Up, Over, In, Normal Picot Join , Single


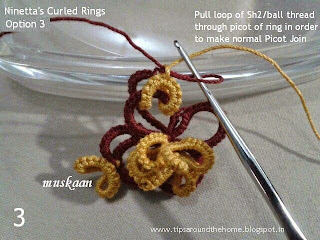
 Ninetta has photographed this option in her earring pattern here.


UPDATE :
This style is demonstrated by Karen Cabrera in Lesson 145 here. She calls them Folded Rings.
Did you notice or have an Eureka moment for this last Option ?
Does it not strike you as being an attachment to previous round/row ?! We always use a picot for this purpose ; and here, an entire ring is performing that very function, with a fashionable turn :-D
It's really that simple and brilliant . So while designing, if you forget to put a picot in previous row, but feel the need to join while working the subsequent row, you now know what to do !
That's it for this time. If you feel inspired, please go ahead and play & experiment & enjoy :-)
happy tatting :-)
Related Posts : concept
Wonderful tuto.
ReplyDeleteThanks, Ninetta :-)
DeleteHeard from Karen Cabrera. She has uploaded a video of the basic process . I will, add the link in the post above.
Awesome tutorial! Your flower looks like an orchid :).
ReplyDeleteNow that you mention it, Jenn :-)
DeleteFrom the very first moment I saw her rings, I was captured by their potential in 3D tatting. There are still many ideas rolling away in my brain --- don't know how many I will be able to make & share ;-P
Thanks :-)
Fascinating!
ReplyDeleteMy fascination with this simple effect/technique still continues --- I'm enjoying it tremendously , Jane :-)
DeleteLove your experimenting, it lets the imagination run wild and the little pearl looks so stylish with that bit of curl beside it. Thanks for taking the time to run with these new techniques!
ReplyDeleteHugs again from Carollyn :)